I’ve blogged before about how I’m doing some of my own data analysis on the COVID-19 numbers. One thing that I didn’t like about my graphs was that they didn’t contain an x-axis, which made them a little bit harder to read.
In this (very quick) blog post I’ll show you how to add an x-axis to a matplotlib plot.
Preparation for the graph
Let’s start with the data we’ll use for this graph. If you want more information about these intro steps, please refer to my previous post.
%matplotlib inline
import matplotlib
import numpy as np
import matplotlib.pyplot as plt
import pandas as pd
cases = pd.read_csv('https://raw.githubusercontent.com/CSSEGISandData/COVID-19/master/csse_covid_19_data/csse_covid_19_time_series/time_series_covid19_confirmed_US.csv')
cases_clean = cases[cases["Province_State"] == "California"].set_index("Admin2").T.drop(['UID','iso2','iso3','code3','FIPS','Province_State','Country_Region','Lat','Long_','Combined_Key'])Now that we have a cases dataset, we can plot that dataset. In my case, I’m interested in 4 counties, so we’ll filter by those four counties:
counties = ['Alameda',
             'San Francisco',
             'San Mateo',
             'Santa Clara']
plot = cases_clean[counties].plot(figsize=(20,10))
plot.set_title("COVID-19 cases in Bay Area Counties")This returns a plot that looks like this:
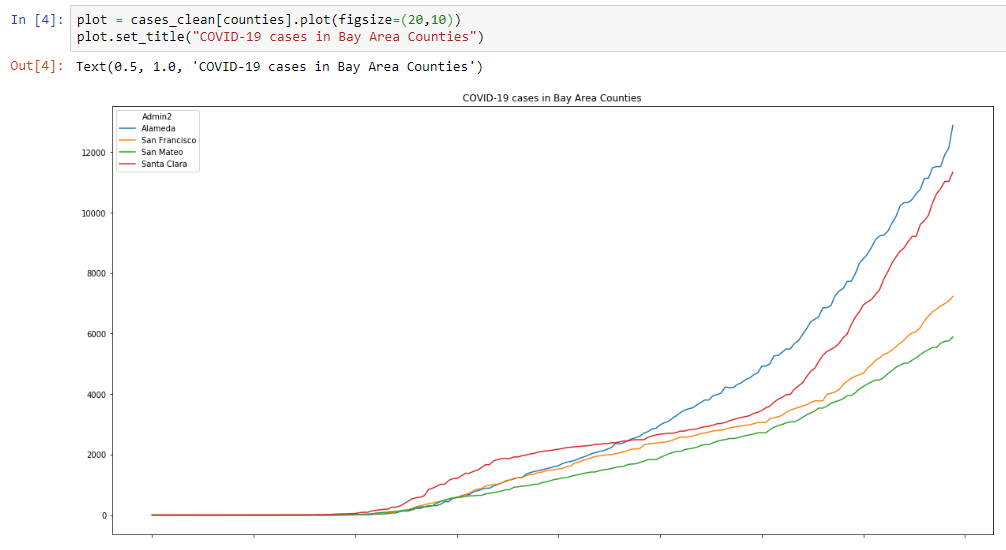
As you can see, the x-asis is empty. Let’s try to fix this.
Adding an x-axis and labels
When it comes to the x-axis in matplotlib, there’s two important pieces to that axis:
- x-ticks: The place in the dataset where you want a label to be applied
- x-ticks-labels: The label you want to put at the tick
Practically in our case, I believe it would be interesting to show 10 dates along the x-axis. This means that we’ll need to generate two objects to pass to matplotlib:
- x-ticks: 10 equally spaced tick labels.
- x-labels: The labels we want to pass
For the first, we can use the np.arange() function. For the second, we can use a slice of the original dataframe. To get that slice, we can use the ticks array. These ticks are of the float type, which we’ll need to convert to integer to get them to work as a slide.
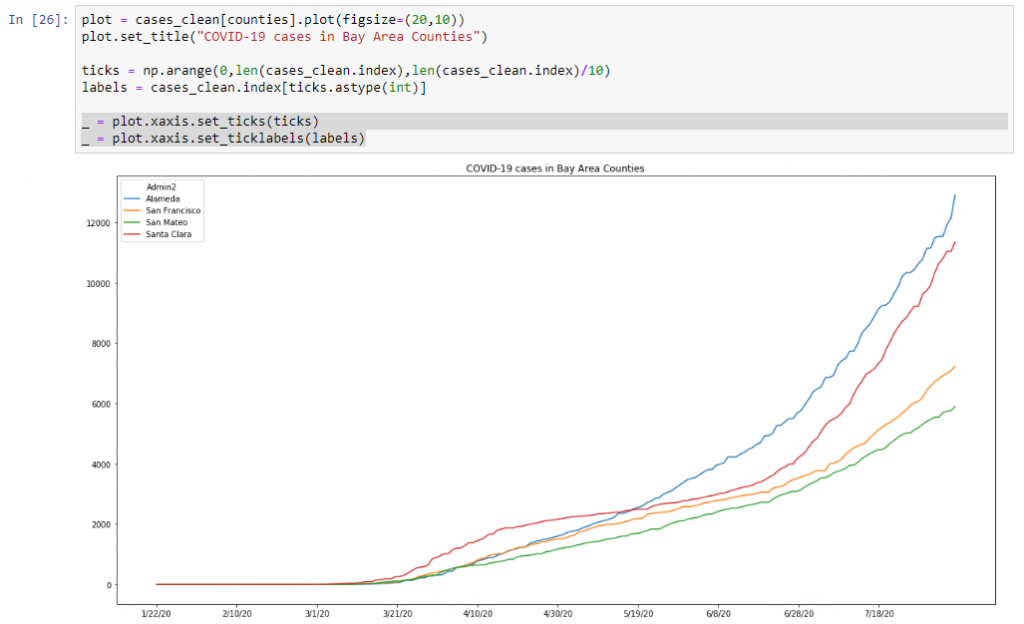
ticks = np.arange(0,len(cases_clean.index),len(cases_clean.index)/10)
labels = cases_clean.index[ticks.astype(int)]
We can now use these two objects to create the ticks and the labels on the graph. Please note, that to update the graph, you’ll need to make all of this part of the cell that generates the graph.
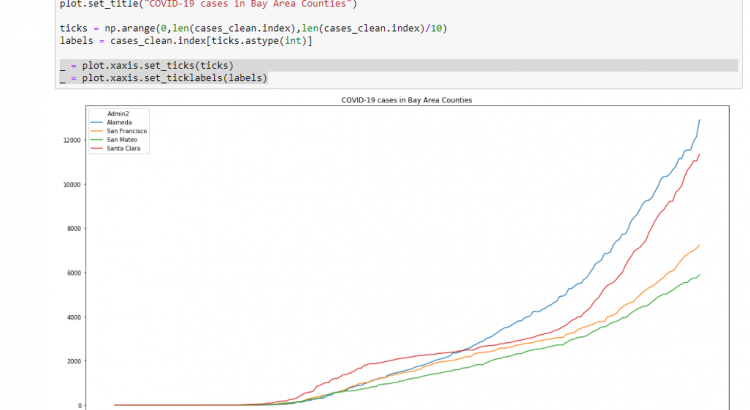
_ = plot.xaxis.set_ticks(ticks)
_ = plot.xaxis.set_ticklabels(labels)
short note: the _ = is optional, but it avoids verbose output in the notebook.
All of this results in a figure that looks like this:
Bonus: create graphs of the last X days
As you can see, this graph goes all the way back to January. Maybe, you’re most interested in the data from the past X days. It’s pretty straightforward to adapt this python code to reflect data from the past e.g. 100 days by using the tail() function:
plot = cases_clean[counties].tail(100).plot(figsize=(20,10))
plot.set_title("COVID-19 cases in Bay Area Counties in last 100 days.")

ticks = np.arange(0,len(cases_clean.tail(100).index),len(cases_clean.index)/10)
labels = cases_clean.tail(100).index[ticks.astype(int)]

_ = plot.xaxis.set_ticks(ticks)
_ = plot.xaxis.set_ticklabels(labels)
Which will results in the following graphic:
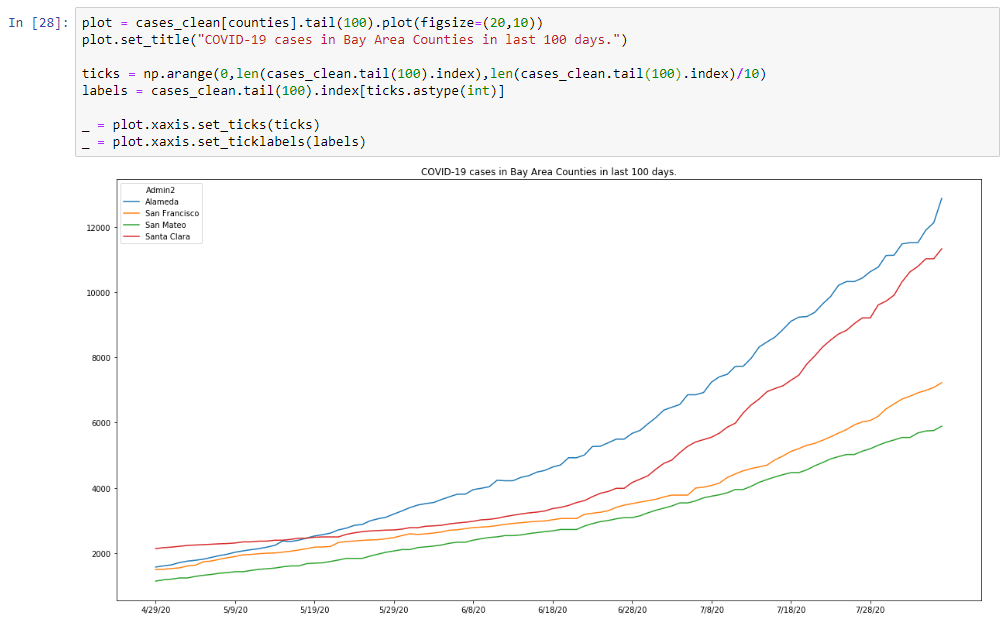
And as you can see, the x-axis automatically adjusted (well, not automatically, we need to add the tail function there as well).
Conclusion
This was a short and quick post explaining how to add an x-axis and labels to a matplotlib graph in a Python notebook. I hope you find this useful. If you generate any interesting graphs, don’t hesitate to share them with me on either Twitter or LinkedIn!