
Today I helped a colleague and his customer out with automating the building of their images using Packer. I thought: why not share the experience.
What is Packer?
Packer is a tool developed by Hashicorp (the company behind Terraform) that makes it easy to automate the creation of custom images (or AMIs in AWS). The tool itself will automate the creation of VMs, will run whatever scripts you want it to run, and will then instruct your cloud provider to take that image. Packer itself is a client-side tool which will connect to your cloud provider to do the configuration.
Setting up Packer on your machine
I mentioned that Packer is a client-side tool. It’s a simple binary; installing it is as simple as downloading the binary and adding it your path. I decided to copy it to /usr/local/bin – but you can store it anywhere on your path.
btw. If you’re planning to run this in the Azure cloud shell, Packer comes pre-installed.
mkdir packer
cd packer
wget https://releases.hashicorp.com/packer/1.4.3/packer_1.4.3_linux_amd64.zip
unzip packer_1.4.3_linux_amd64.zip
sudo mv packer /usr/local/bin
cd ..
rm -rf packer
Creating a first simple Windows Image on Azure
Let’s start with creating a simple Windows image. To get packer to run, it needs access to a service principal and a RBAC rights to your subscription. When Packer builds the image, it will create a new resource group, deploy the machine, create the image and then destroy that resource group, hence it requires RBAC. The following script will do that:
rgName="image-rg"
location="westus2"
az group create -n $rgName -l $location
az ad sp create-for-rbac --name nf-packer-windows
#note down appid and password
appid=yourappid
sppassword=yourpassword
Ok, with that done, we can go ahead and create our first Packer image. The json definition below will install IIS on a Windows machine and sysprep it.
{
  "builders": [{
    "type": "azure-arm",

    "client_id": "xxx",
    "client_secret": "xxx",
    "tenant_id": "you can get this via az account show",
    "subscription_id": "you can get this via az account list",

    "managed_image_resource_group_name": "image-rg",
    "managed_image_name": "packer-windows",

    "os_type": "Windows",
    "image_publisher": "MicrosoftWindowsServer",
    "image_offer": "WindowsServer",
    "image_sku": "2016-Datacenter",

    "communicator": "winrm",
    "winrm_use_ssl": true,
    "winrm_insecure": true,
    "winrm_timeout": "5m",
    "winrm_username": "packer",


    "location": "westus2",
    "vm_size": "Standard_DS2_v2"
  }],
  "provisioners": [{
    "type": "powershell",
    "inline": [
      "Add-WindowsFeature Web-Server",
      "& $env:SystemRoot\\System32\\Sysprep\\Sysprep.exe /oobe /generalize /quiet /quit",
      "while($true) { $imageState = Get-ItemProperty HKLM:\\SOFTWARE\\Microsoft\\Windows\\CurrentVersion\\Setup\\State | Select ImageState; if($imageState.ImageState -ne 'IMAGE_STATE_GENERALIZE_RESEAL_TO_OOBE') { Write-Output $imageState.ImageState; Start-Sleep -s 10  } else { break } }"
    ]
  }]
}
To build this image, you use the following command in your shell:
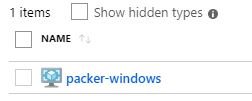
packer build simpleimage.jsonThis will take about 15 minutes to complete, and afterwards you should see your image pop up:
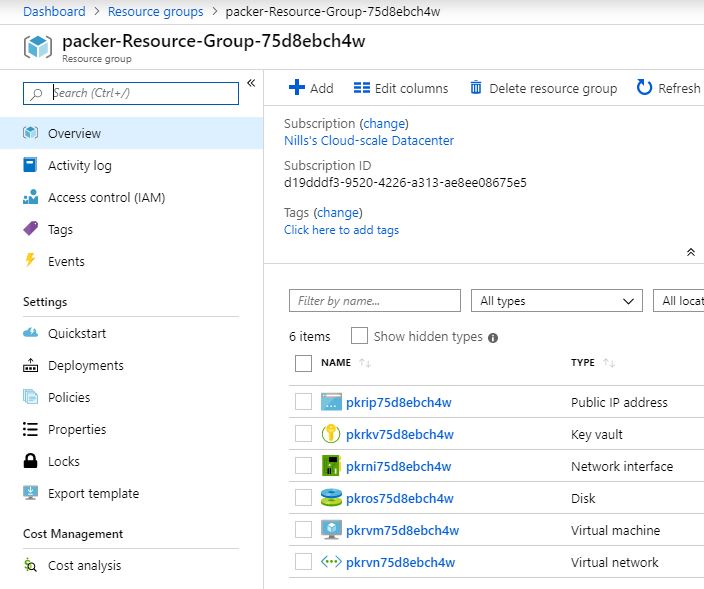
If you are curious like I am, I also had a peek in the resource group Packer created. There’s 1 strange thing to see there, which an Azure Key Vault. I had a quick look in the Packer source code to see what that was used, and it appears this Key Vault is used to store the certificate used by WinRM.
Adding an external script to your template – making image names unique
In our previous example, we did a relatively simple deployment – where we used an inline script to do our configuration. In a more complex setup, you’ll probably want to use an external script that is developed independently from your Packer template.
This is where the file operator comes in handy. You’ll find a quick example below of copying a PowerShell script from your local machine to Packer which Packer will execute on the target machine.
Another thing I changed in the file is I added a timestamp to our image name. This comes in handy when you’re building multiple versions and you need to maintain unique image names.
{
  "builders": [{
    "type": "azure-arm",

    "client_id": "xxx",
    "client_secret": "xxx",
    "tenant_id": "72f988bf-86f1-41af-91ab-2d7cd011db47",
    "subscription_id": "d19dddf3-9520-4226-a313-ae8ee08675e5",

    "managed_image_resource_group_name": "image-rg",
    "managed_image_name": "worker-{{timestamp}}",

    "os_type": "Windows",
    "image_publisher": "MicrosoftWindowsServer",
    "image_offer": "WindowsServer",
    "image_sku": "2016-Datacenter",

    "communicator": "winrm",
    "winrm_use_ssl": true,
    "winrm_insecure": true,
    "winrm_timeout": "5m",
    "winrm_username": "packer",


    "location": "westus2",
    "vm_size": "Standard_DS2_v2"
  }],
  "provisioners": [
    {
      "type": "file",
      "source": "worker.ps1",
      "destination": "c:\\worker.ps1",
      "direction": "upload"
     },
    {
    "type": "powershell",
    "inline": "c:\\worker.ps1"
  }]
}
This template will copy a file called worker.ps1 on our local system to the C-drive on our temporary system and execute that script. Please note that my target script also contains the sysprep logic that was previously executed in-line.
Adding variables to your template
Finally, you’ll probably also want to add variables to your template. This will allow you to re-use the same template and pass in updates or create different versions using variables.
Let’s update our template to also allow for variables. We’ll add in 3 variables and reference those in the template.
{
  "variables": {
    "file1-download-url": "",
    "file2-download-url": "",
    "functionality": ""
  },

  "builders": [{
    "type": "azure-arm",

    "client_id": "xxx",
    "client_secret": "xxx",
    "tenant_id": "72f988bf-86f1-41af-91ab-2d7cd011db47",
    "subscription_id": "d19dddf3-9520-4226-a313-ae8ee08675e5",

    "managed_image_resource_group_name": "image-rg",
    "managed_image_name": "{{user `functionality`}}-{{timestamp}}",

    "os_type": "Windows",
    "image_publisher": "MicrosoftWindowsServer",
    "image_offer": "WindowsServer",
    "image_sku": "2016-Datacenter",

    "communicator": "winrm",
    "winrm_use_ssl": true,
    "winrm_insecure": true,
    "winrm_timeout": "5m",
    "winrm_username": "packer",


    "location": "westus2",
    "vm_size": "Standard_DS4_v2"
  }],
  "provisioners": [
    {
      "type": "file",
      "source": "setup.ps1",
      "destination": "c:\\setup.ps1",
      "direction": "upload"
     },
    {
    "type": "powershell",
    "inline": "c:\\setup.ps1 -file1 '{{user `file1-download-url`}}' -file2 '{{user `file2-download-url`}}'  -functionality '{{user `functionality`}}' "
  }]
}
And next to that, we can create a variables file:
{
    "file1-download-url": "https://nfnstacc1.blob.core.windows.net/demo/blob.txt",
    "file2-download-url": "https://nfnstacc1.blob.core.windows.net/demo/blob2.txt",
    "functionality": "web-server"
}
In order to deploy this using Packer, the following command will do the job:
packer build -var-file packer.vars.json packer.jsonConclusion
I had a blast playing around with Packer. It’s been on my ‘I want to play around with this’-list for a couple of months, and I never got around to it. Now that I’ve used it once, it showed me how easy it is to create custom images. I’ve spent to many hours logging into Windows boxes, and doing a mistake in the Sysprep configuration. Packer takes that burden away.
Now, there is an Azure service called the Image Builder. It would also run Packer under the cover, but I have no clue how that runs. Maybe that’s a topic for future exploration.