This is part 4 in a multi-series on my CKAD study efforts. You can find previous entries here:
- Part 1: intro, exam topics and my study plan
- Part 2: Core concepts
- Part 3: Configuration
- Part 5: Observability
- Part 6: Pod Design
- Part 7: Networking
Think back about part 2 of this series: we briefly discussed basic pods. I mentioned there that a pod is the basic execution unit within Kubernetes. A pod can contain multiple containers in it. With those multiple containers, we can build interesting design pattern.
Brendan Burns has written a stellar book on different of these design patterns, which is available for free. The book is an evolution of previous work Brendan had been doing. The same concepts were presented in 2016 at the HotCloud conference, both as a paper and as a presentation.
The first part of the book focuses on what we’ll cover in this CKAD study material, namely the side, ambassador and adapter pattern.
These patterns look pretty similar when it comes to the technical implementation. In essence they take an existing container, and add functionality to it by adding another container. There is however a difference between the actual functionality of a sidecar, an ambassador or an adapter:
- A sidecar container adds functionality to your application that could be included in the main container. By hosting this logic in a sidecar, you can keep that functionality out of your main application and evolve that independently from the actual application.
- An ambassador container proxies a local connection to certain outbound connection. The ambassadors brokers the connection the outside world. This can for instance be used to shard a service or to implement client side load balancing.
- An adapter container takes data from the existing application and presents that in a standardized way. This is for instance very useful for monitoring data.
The exam objective states three patterns (ambassador, adapter and sidecar) which we’ll dive into and we’ll end this topic with init-containers. These aren’t part of the exam objective, but are a useful multi-container pod design pattern as well.
Sidecars
A sidecar adds functionality to an existing application. This functionality could be saving certain files in a certain location, copying files continuously from one location to another or for instance be terminate SSL and have your “legacy” web server run unchanged.
Multiple containers in a pod share their network and storage namespace, meaning a sidecar can connect to the main container on localhost; and they can mount the same volumes.
Let’s build an example together that implements an nginx SSL termination in front of an apache webserver.
We’ll start of simply with an apache webserver. We’ll also add a service to this pod; so we can get traffic from the inside into our pod. To build this example I leveraged the nginx documentation and a digitalocean tutorial.
apiVersion: v1
kind: Pod
metadata:
name: sidecar
labels:
app: web-server
spec:
containers:
- name: apache-web-server
image: httpd
ports:
- containerPort: 80
---
apiVersion: v1
kind: Service
metadata:
name: port-80-service
spec:
selector:
app: web-server
ports:
- protocol: TCP
port: 80
targetPort: 80
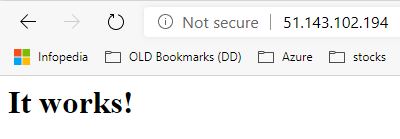
type: LoadBalancerThis will create a pod on port 80 and also a service on port 80. I created a service of type LoadBalancer, which will create an Azure Load Balancer that I can then reach. We can its by doing kubectl get service --watch (it takes a couple moments for the IP to become assigned). We can then see it works, but our website is not secure:
Let’s now add an nginx in front, that will serve SSL. Bare with me, as this is not a single step process.
To start, we’ll create an SSL certificate (self-signed) (following this tutorial)
mkdir ssl
cd ssl
openssl req -new -newkey rsa:4096 -x509 -sha256 -days 365 -nodes -out MyCertificate.crt -keyout MyKey.key
Then fill in your details to get the certificate.
Next, we’ll create two secrets (remember part 3 of our series?) in kubernetes for each of those files:
kubectl create secret generic mycert --from-file MyCertificate.crt
kubectl create secret generic mykey --from-file MyKey.key
In addition to our secrets, we’ll also need an nginx configuration file that will tell nginx where to find the certificate and the key – as well as to enable traffic forwarding (or reverse proxying). This nginx configuration file did the job for me, which I subsequently turned into a configmap:
server {
    listen       443 ssl default_server;
    server_name  localhost;
    ssl_certificate     /etc/certstore/MyCertificate.crt;
    ssl_certificate_key /etc/keystore/MyKey.key;
    ssl_ciphers         EECDH+AESGCM:EDH+AESGCM:AES256+EECDH:AES256+EDH;
    ssl_protocols       TLSv1.1 TLSv1.2;


    location / {
            proxy_pass http://127.0.0.1:80;
    }


    error_page   500 502 503 504  /50x.html;
    location = /50x.html {
        root   /usr/share/nginx/html;
    }

}
kubectl create configmap nginx-config --from-file default.confThen we’ll add an nginx container to our apache container, and mount our two secrets and our configmap in our container.
apiVersion: v1
kind: Pod
metadata:
name: sidecar
labels:
app: web-server
spec:
containers:
- name: apache-web-server
image: httpd
ports:
- containerPort: 80
- name: nginx-ssl-terminator
image: nginx
ports:
- containerPort: 443
volumeMounts:
- name: cert
mountPath: /etc/certstore/
- name: key
mountPath: /etc/keystore/
- name: config
mountPath: /etc/nginx/conf.d/
volumes:
- name: cert
secret:
secretName: mycert
- name: key
secret:
secretName: mykey
- name: config
configMap:
name: nginx-config
---
apiVersion: v1
kind: Service
metadata:
name: port-443-service
spec:
selector:
app: web-server
ports:
- protocol: TCP
port: 443
targetPort: 443
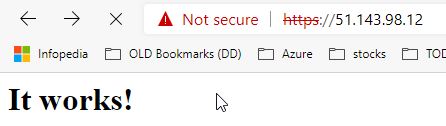
type: LoadBalancerWe can create this by first deleting our existing solo pod with kubectl delete pod sidecar, and then we create the multi-container pod with a new kubectl create -f simplepod.yaml. If we give this a couple of moments, this will create all our containers, setup the networking, and afterwards we can browse the ip. You’ll get a giant security warning which means that it’s working (the security warning is due to our self-signed certificate.)
So, now you’ve seen a sidecar at work. We’ve added a nginx SSL terminator in front of our apache web server.
Ambassador
The ambassador pattern is another multi-container pod design pattern. With the ambassador pattern, you pair a second container with your main application to broker outside connections. A good example is to use the ambassador pattern is to shard communication to an external system (e.g. a database). Another good use case is to enable service discovery and configuration to an external system. Imagine running the same application on-prem and in multiple cloud environments; all leveraging platform-specific MySQL databases. An ambassador container could be used to enable the application to connect to the right database, without having to build in logic into the main application to do this service discovery.
Let’s build an example where we have a simple pod making outbound http connections through the ambassador. We’ll have the ambassador split traffic between the 2 backends, with a 3:1 ratio; meaning 75% of the traffic goes to server 1 and 25% goes to server 2.
Let’s start off with creating our sample application servers. We’ll start of with creating some “dumb” boilerplate HTML, that we’ll then load into an nginx container.
<!DOCTYPE html>
<html>
<head>
    <title>Server 1</title>
</head>
<body>
Server 1
</body>
</html>
<!DOCTYPE html>
<html>
<head>
<title>Server 2</title>
</head>
<body>
Server 2
</body>
</html>We’ll create both as a configmap in kubernetes:
kubectl create configmap server1 --from-file=index1.html
kubectl create configmap server2 --from-file=index2.html
You might have noticed we used index1.html and index2.html as files. Nginx only server index.html files by default. As I don’t want to go ahead and start moving files around or editing configfiles for nginx, there is a lazy trick you can use to edit the configmap, to rename the file the actual index.html
kubectl edit configmap server1This will present you with a vi-alike interface, and you can delete the 1 from index1.html. Same thing for server2 as well.
We’ll then create our pods, including a service for each of them. The reason we create a service, is so Kubernetes will do name resolution for us:
apiVersion: v1
kind: Pod
metadata:
  name: server1
  labels:
    app: web-server1
spec:
  containers:
    - name: nginx-1
      image: nginx
      ports:
        - containerPort: 80
      volumeMounts:
        - name: index
          mountPath: /usr/share/nginx/html/
  volumes:
    - name: index
      configMap:
        name: server1
---
apiVersion: v1
kind: Pod
metadata:
  name: server2
  labels:
    app: web-server2
spec:
  containers:
    - name: nginx-2
      image: nginx
      ports:
        - containerPort: 80
      volumeMounts:
        - name: index
          mountPath: /usr/share/nginx/html/
  volumes:
    - name: index
      configMap:
        name: server2
---
apiVersion: v1
kind: Service
metadata:
  name: server1
spec:
  selector:
    app: web-server1
  ports:
  - protocol: TCP
    port: 80
    targetPort: 80
  type: ClusterIP
---
apiVersion: v1
kind: Service
metadata:
  name: server2
spec:
  selector:
    app: web-server2
  ports:
  - protocol: TCP
    port: 80
    targetPort: 80
  type: ClusterIP
These are our applications, that we can reach through DNS within the default namespace on their service names. Let’s now create our pod with an ambassador in there. First of, we’ll create an nginx config (nginx will be our forward proxy/ambassador) that will do traffic shaping in 3:1 fashion:
    upstream myapp1 {
        server server1 weight=3;
        server server2;
    }

    server {
        listen 80;

        location / {
            proxy_pass http://myapp1;
        }
    }
kubectl create configmap nginxambassador --from-file=nginx.confAfter that, we’ll create our ambassador pod:
apiVersion: v1
kind: Pod
metadata:
  name: ambassador
  labels:
    app: ambassador
spec:
  containers:
    - name: busybox-curl
      image: radial/busyboxplus:curl
      command:
        - sleep
        - "3600"
    - name: nginx-ambassador
      image: nginx
      ports:
        - containerPort: 80
      volumeMounts:
        - name: config
          mountPath: /etc/nginx/conf.d/
  volumes:
    - name: config
      configMap:
        name: nginxambassador
We can then exec into our ambassador, and do a couple of curls, and watch the result. We should see a 3:1 traffic pattern:
We can then exec into our ambassador, and do a couple of curls, and watch the result. We should see a 3:1 traffic pattern:

kubectl exec -it ambassador sh
curl localhost:80 #repeat to see 3:1 distribution
Adapter pattern
Adding an adapter container to an existing application will function like a physical adapter, it will convert one output to another. In the real world we could use an adapter to convert a US power cable to fit in a EU socket; in container world we could use an adapter to fit container logging and monitoring into prometheus.
Different applications store logs and metrics in different locations, and potentially in different formats. This could be solved by standardizing coding practices, and it could also be solved by implementing an adapter. This adapter will transform the monitoring interface from the application into the interface that the monitoring system (e.g. prometheus) will expect.
Let’s try this out with a Redis container. We’ll setup a prometheus system, and use that to monitor Redis.
We’ll start off by installing the prometheus operator on our cluster. This will allow us to use the kubernetes API to manage prometheus.
helm install stable/prometheus-operator --name prometheus-operator --namespace monitoringThis will take about 2 minutes to setup prometheus end-to-end.
With our prometheus operator all setup – we can go ahead and create our adapter pattern, and then leverage the prometheus operator to monitor our pods. First we need to create a service account, role and rolebinding for prometheus to be able to talk the kubernetes API. Let’s do that first:
kubectl create serviceaccount prometheusapiVersion: rbac.authorization.k8s.io/v1beta1
kind: ClusterRole
metadata:
name: prometheus
rules:
- apiGroups: [""]
resources:
- nodes
- services
- endpoints
- pods
verbs: ["get", "list", "watch"]
- apiGroups: [""]
resources:
- configmaps
verbs: ["get"]
- nonResourceURLs: ["/metrics"]
verbs: ["get"]
---
apiVersion: rbac.authorization.k8s.io/v1beta1
kind: ClusterRoleBinding
metadata:
name: prometheus
roleRef:
apiGroup: rbac.authorization.k8s.io
kind: ClusterRole
name: prometheus
subjects:
- kind: ServiceAccount
name: prometheus
namespace: defaultkubectl create -f clusterrole.yamlWith that done, we can create our deployment of Redis, and do the prometheus configuration.
apiVersion: apps/v1
kind: Deployment
metadata:
  name: redis-adapter
spec:
  replicas: 2
  selector:
    matchLabels:
      app: redis-adapter
  template:
    metadata:
      labels:
        app: redis-adapter
    spec:
      containers:
      - image: redis
        name: redis
      - image: oliver006/redis_exporter #this is our adapter
        name: adapter
        ports:
          - name: redis-exporter
            containerPort: 9121
---
kind: Service #we need to create a service to have prometheus do the discovery
apiVersion: v1
metadata:
  name: redis-adapter
  labels:
    app: redis-adapter
spec:
  selector:
    app: redis-adapter
  ports:
  - name: redis-exporter
    port: 9121
---
apiVersion: monitoring.coreos.com/v1
kind: ServiceMonitor #a servicemonitor tells prometheus which services to monitor/scrape
metadata:
  name: redis-adapter
  labels:
    app: redis-adapter
spec:
  selector:
    matchLabels:
      app: redis-adapter
  endpoints:
  - targetport: 9121
---
apiVersion: monitoring.coreos.com/v1
kind: Prometheus #this creates an actual prometheus instance that will do the scraping
metadata:
  name: prometheus
spec:
  serviceAccountName: prometheus
  serviceMonitorSelector:
    matchLabels:
      app: redis-adapter
  resources:
    requests:
      memory: 400Mi
  enableAdminAPI: false
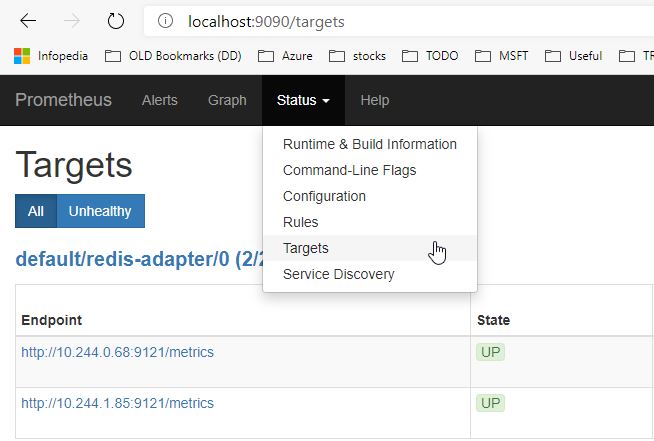
We can then access our prometheus pod, and see prometheus actually do the scraping:
kubectl get pods #get the name of the prometheus pod here
kubectl port-forward prometheus-prometheus-0 9090
Then take a browser and head to localhost:9090. You can either enter queries here (type in redis to have autocomplete help out) or go to Status > Targets to see your healthly Redis instances.
(disclaimer, I made it look really easy to get Prometheus up and running and monitoring Redis. I spent a sizeable amount of time and frustration to get this up and running. I hope to save you some time with my steps)
Init-containers
I believe init-containers deserve a spot in the multi-container pod discussion. An init-container is a special container that runs before the other containers in your pod. This can be useful if you have to wait for an external database to be created, or this can be used to do configuration of your application by keeping the configuration piece out of the actual application container.
As a very small example, let’s create an nginx pod – and have an init-container clone a git repo that contains our index.html file. I already had a small repo on Github with a very interesting index.html file.
apiVersion: v1
kind: Pod
metadata:
  name: init
spec:
  containers:
    - name: nginx-1
      image: nginx
      ports:
        - containerPort: 80
      volumeMounts:
        - name: html
          mountPath: /usr/share/nginx/html/
  initContainers:
  - name: clone-github
    image: alpine/git
    args:
        - clone
        - --single-branch
        - --
        - https://github.com/NillsF/html-demo.git
        - /usr/share/nginx/html/
    volumeMounts:
    - name: html
      mountPath: /usr/share/nginx/html/
  volumes:
  - name: html
    emptyDir: {}
When we create this (using kubectl create -f init.yaml) – it is very insightful to do a kubectl get pods --watch to see the pod cycle through the git steps.
NAME                             READY   STATUS     RESTARTS   AGE
init                             0/1     Init:0/1   0          6s
init                             0/1     Init:0/1   0          7s
init                             0/1     PodInitializing   0          8s
init                             1/1     Running           0          10s
Let’s now exec into our pod (kubectl exec -it init sh), to see if we actually pulled in our files from git:
# cd /usr/share/nginx/html
# cat index.html
<!DOCTYPE html>
<html>
<body>

<h1>This is a nice demo.</h1>
<p>My first paragraph.</p>

</body>
</html>
Summary of multicontainer pods
In this section, we learned all about sidecars, ambassadors and adapters; while also introducing init-containers. I highly recommend Brendan Burns’s book to learn more about the patterns themselves, rather than simply how to implement them as I discussed here.
Up to part 5 now?
Thank you for this blog! I didn’t get the difference between sidecar and adapter. We could also put redis-exporter inside the main container and get the same functionality.
Hi Antonio,
The difference between sidecar and adapter is a subtle one. Consider a sidecar as something ADDING functionality, while a adapter just translates an output in a consistent format. You could indeed put the functionality in the main container – but if you have multiple deployments/different project / different teams doing this, having a multi-container pod (whichever you need) can create consistency between implementations. The book I mentioned in the introduction will help put things even more in context.